Navigation
For a navigation system, the robot must be able to identify the environment, locate itself in relation to the environment and travel to the goal position whilst avoiding obstacles.
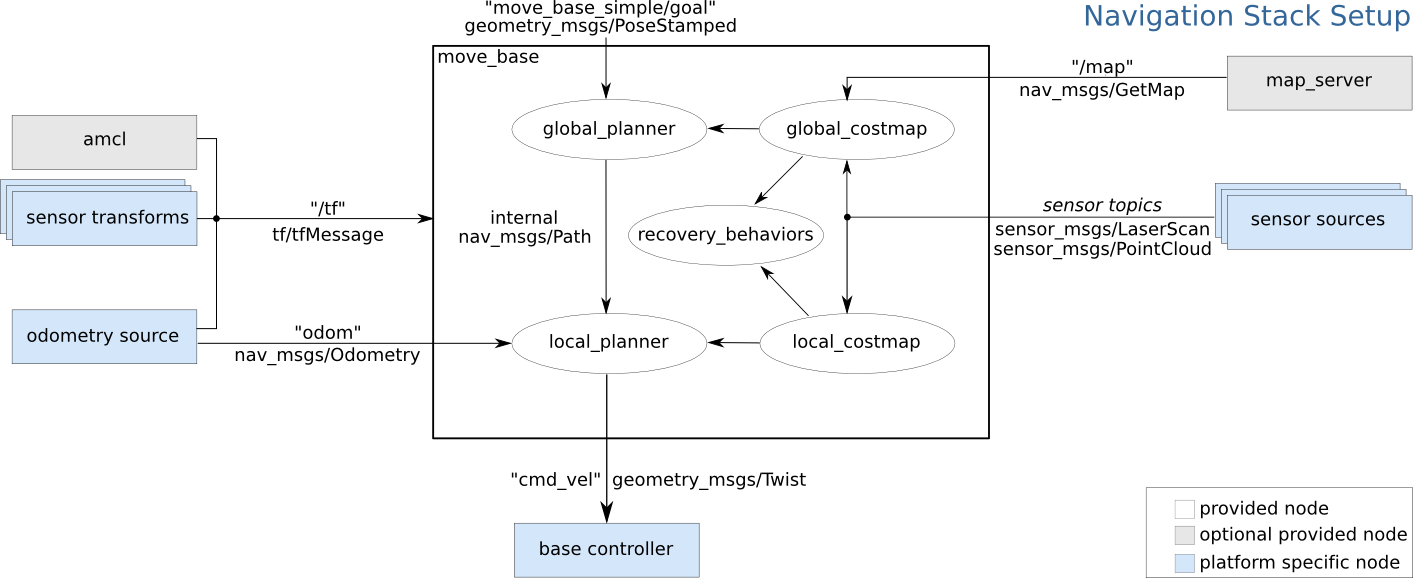
For self driving algorithm we utilize AMCL and virtual sensors. Most of the nodes and ROS Navigation Setup is already set up. Here is the block diagram showing the ROS messages required for the navigation stack.
For navigation system located on our actual zetabot, we use SLAM AMCL to first initialize the map and ourselves in prespective of the map. However for our virtual environment, it is recommended to provide an occupancy map before the navigation task.
Occupancy Map
In order to create a Occupancy Map:
Open the Occupancy Map Window (Isaac Utils -> Occupancy Map)
Set the Origin axis to 0:
X: 0.0, Y: 0.0, Z: 0.0Set the Z values of the lower and upper bound:
Upper bound = Z: 0.62,Lower bound = Z: 0.1Select document variable in the Stage window and click
BOUND SELECTIONin the Occupancy Map window. This will automatically set the X Y variables of the Upper and Lower Bounds.(NOTE) If some components within the map does not have any weight value, it might cause error in the following executions.
Click the
CALCULATEfollowed by theVISUALIZEbutton. This will calculate the occupance map and visualize the calculated map.
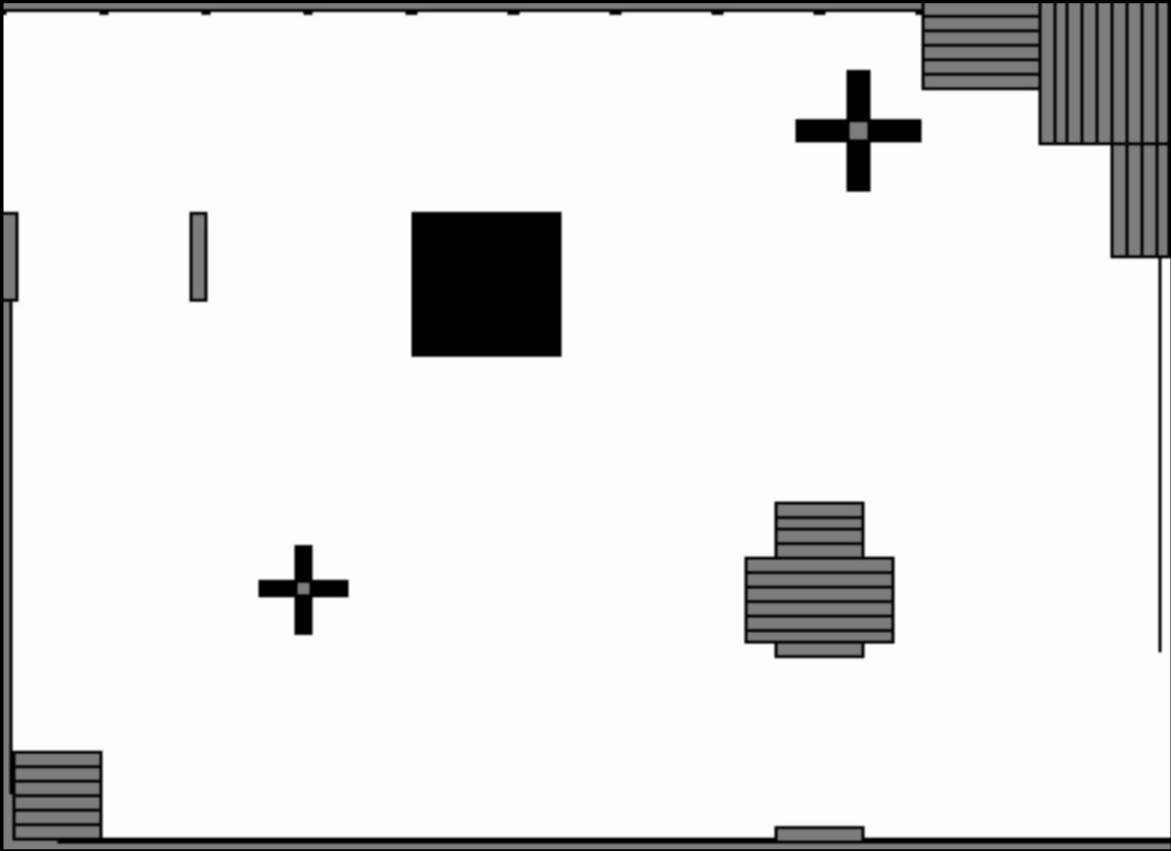
Rotate the image to fit match the simulated angle.
Create a Yaml file within the Map directory (for our application the map directory is located in
/home/zetabank/dev_ws/src/zeta_navigation/zeta_2dnav/map), and copy the the text file generated. Example:image: zeta_map1_navigation.png resolution: 0.01 origin: [0, 0, 0] negate: 0 occupied_thresh: 0.65 free_thresh: 0.196
Save the occupancy map in the map directory.
Open the
/home/zetabank/dev_ws/src/zeta_navigation/zeta_2dnav/launchdirectory, and create a.launch filethat follows these form:<launch> <param name="use_sim_time" value="true" /> <!-- Load Robot Description --> <arg name="model" default="$(find zeta_description)/urdf/zeta_220922.urdf"/> <param name="robot_description" textfile="$(arg model)" /> <!-- Run the map server --> <node name="map_server" pkg="map_server" type="map_server" args="$(find zeta_2dnav)/map/name of the yaml file.yaml" /> <!--- Run AMCL --> <include file="$(find amcl)/examples/amcl_diff.launch" /> <!-- starting position of the robot> <param name="/amcl/initial_pose_x" value="3.5"/> <param name="/amcl/initial_pose_y" value="0.4"/> <param name="/amcl/initial_pose_a" value="-3.14"/> <node pkg="move_base" type="move_base" respawn="false" name="move_base" output="screen"> <rosparam file="$(find zeta_2dnav)/params/costmap_common_params.yaml" command="load" ns="global_costmap" /> <rosparam file="$(find zeta_2dnav)/params/costmap_common_params.yaml" command="load" ns="local_costmap" /> <rosparam file="$(find zeta_2dnav)/params/local_costmap_params.yaml" command="load" /> <rosparam file="$(find zeta_2dnav)/params/global_costmap_params.yaml" command="load" /> <rosparam file="$(find zeta_2dnav)/params/base_local_planner_params.yaml" command="load" /> </node> <node type="rviz" name="rviz" pkg="rviz" args="-d $(find zeta_2dnav)/rviz/zeta_2dnav.rviz" /> </launch>
Launch files are .launch formatted specific XML files. It is used to organize and initiate multiple exectutions within a workspace directory.
The contents of the launch file must be contained in a launch tags.
<launch> ... </launch>
Nodes are started with <node> tags where the arguments pkg, type and name must be provided.
<node pkg="..." type="..." name="..." respawn=true ...>
We can see that, when we are importing our map, we are specifying the location of the map at the args arguments:
<!-- Run the map server -->
<node name="map_server" pkg="map_server" type="map_server" args="$(find zeta_2dnav)/map/name of the yaml file.yaml" />
We can also notice that we are initializing the starting position of our robot (within the map)
<!-- starting position of the robot>
<param name="/amcl/initial_pose_x"  value="3.5"/>
<param name="/amcl/initial_pose_y"  value="0.4"/>
<param name="/amcl/initial_pose_a"  value="-3.14"/>
To activate the navigation task, execute the launch file with the following command. (Make sure to open a new terminal)
roslaunch zeta_2dnav zeta_navigation.launch